
3 Aurora Techniques Every Cardmaker Needs to Know
Create Magical Northern Lights with These Adorable North Pole Friends!
Have you ever gazed up at photos of the Northern Lights and wished you could capture that breathtaking beauty on a handmade card? Today, I'm absolutely thrilled to share a project that combines the wonder of aurora borealis with the most adorable polar bears that will completely melt your heart!
I am so excited to share this project with you, because it uses new releases from Spellbinders called North Pole Friends die sets and North Pole Sentiment die sets. I absolutely love these new die sets and they are perfect for your holiday cards and scene building cards.


North Pole Friends by Simon Hurley

North Pole Sentiments by Simon Hurley
Key Takeaways:
- Create three distinctly different looks from a single embossing folder
- Learn proper heat embossing techniques for embossed and debossed surfaces
- Discover troubleshooting tips that prevent common embossing powder mistakes
- Master a special deboss technique most crafters don't know about
Table of Contents:
- Introduction
- Supplies Needed
- Technique 1: The Deboss Gold Method
- Technique 2: The Embossed Highlight Method
- Technique 3: The Negative Space Shimmer
- Troubleshooting Tips
- Completed Projects
- Video Tutorial
- Embossing Folder Club Information
- Frequently Asked Questions
This post contains some affiliate links for your convenience (which means if you make a purchase after clicking a link I will earn a small commission but it won't cost you a penny more)! I only recommend products I truly love. Click here to read my full disclosure policy.
Now let's get into the project
Discover the Magic of Four Mixed Media Aurora Borealis Techniques
In my latest blog post, I'm revealing how to create stunning Northern Lights backgrounds using mixed media techniques that transform simple distress inks into magical, dancing colors across your cardstock. Whether you're a mixed media beginner or looking to expand your techniques, these methods will give you gorgeous results every time!

Four Game-Changing Mixed Media Techniques:
- The Classic Wet-on-Wet Method – Start with saturated mixed media paper and let peacock feathers and picked raspberry distress inks blend naturally to create those magical purple aurora hues that dance across the sky
- The Striped Aurora Technique – Create deliberate linear patterns that perfectly mimic how the Northern Lights shoot vertically across the arctic sky in stunning bands of color
- The Dry-First Control Method – Apply distress ink directly to dry paper first, then add water for a completely different blending effect that gives you more controlled color placement and intensity
- The Glass Mat Smooshing Technique – Use your non-porous craft mat to build up layers of ink, then transfer and manipulate the colors for unique texture effects and depth
Each technique creates its own distinctive aurora effect, giving you four beautiful options to experiment with and perfect!
Meet Your New Favorite Arctic Friends
The absolute stars of this project are the incredibly sweet North Pole Friends from Spellbinders' exciting new release! These adorable polar bears, complete with cozy knitted scarves and the most charming candy cane-striped North Pole sign, will bring instant joy and warmth to anyone who receives your handmade creation.

What You'll Discover in This Comprehensive Tutorial:
- Four distinct mixed media techniques for creating realistic Northern Lights backgrounds, from beginner-friendly to advanced methods
- Step-by-step instructions for achieving that perfect aurora borealis effect with just two distress ink colors
- Professional tips for working with mixed media cardstock and managing water-to-ink ratios
- Complete die-cutting guide for assembling your polar bear friends with proper alignment and layering
- Advanced shading techniques using ink blending to give your bears realistic dimension and shadows
- Snow bank creation methods using scenic dies to build depth and winter landscape elements
- Dimensional shading tips for your snow drifts using tumbled glass distress ink
- Magic white paint splatter techniques for creating authentic-looking snowfall effects
- Assembly secrets for perfect placement and professional-looking finished cards
- Troubleshooting guide for common watercolor challenges like bleeding and over-saturation
- Complete supply list with everything you need, including specific product recommendations
- Full-length video tutorial showing every technique in real-time with close-up details
Perfect for Creating Heartfelt Winter Connections
Whether you're creating holiday cards that capture the magic of winter nights, birthday greetings for someone special, or just want to spread some cozy cheer during the colder months, this project perfectly embodies the heart of what we do at Stamp Me Some Love – creating beautiful cards that foster genuine connections and spread joy.
There's something so deeply heartwarming about handmade cards that capture the wonder of winter landscapes. When someone opens a card featuring these sweet polar bears against a shimmering Northern Lights background, they'll feel the love and care you put into every detail.
Supplies Needed
For the Aurora Borealis Backgrounds:
- Tim Holtz Distressed Watercolor Cardstock (heavyweight essential for multiple water applications)
- Peacock Feathers Distress Ink
- Picked Raspberry Distress Ink
- Spellbinders Mighty Mister (or fine mist spray bottle)
- Glassboard Studio glass craft mat
- ***use promo code SMSL get 10% off
- Heat tool or hair dryer
- Paper towels for cleanup
- Foiling Machine
For the North Pole Friends:
- Spellbinders North Pole Friends Die Set
- Spellbinders North Pole Sentiment Die Set
- Alabaster cardstock (for polar bears)
- Pomegranate cardstock (for scarves and sign)
- Portabella cardstock (for foot pad backing)
- White cardstock (for sign base and candy cane pole)
- Cashmere ink (Catherine Pooler) for bear shading
- Copic Marker R20 for cheek coloring
For the Snow Banks:
- Spellbinders Color Block Scenic Scape Dies
- Neenah Solar White Cardstock
- Tumbled Glass Distress Ink
- Ink blending brushes
- Bearly Art Glue
For Final Details:
- White acrylic paint (titanium white recommended)
- DIY splatter box or large box for paint splattering
- Small detail brushes for precision work
- Liquid adhesive
- Tweezers for small piece placement
- Fine Tip Bottle
Supply List – Easy Shopping
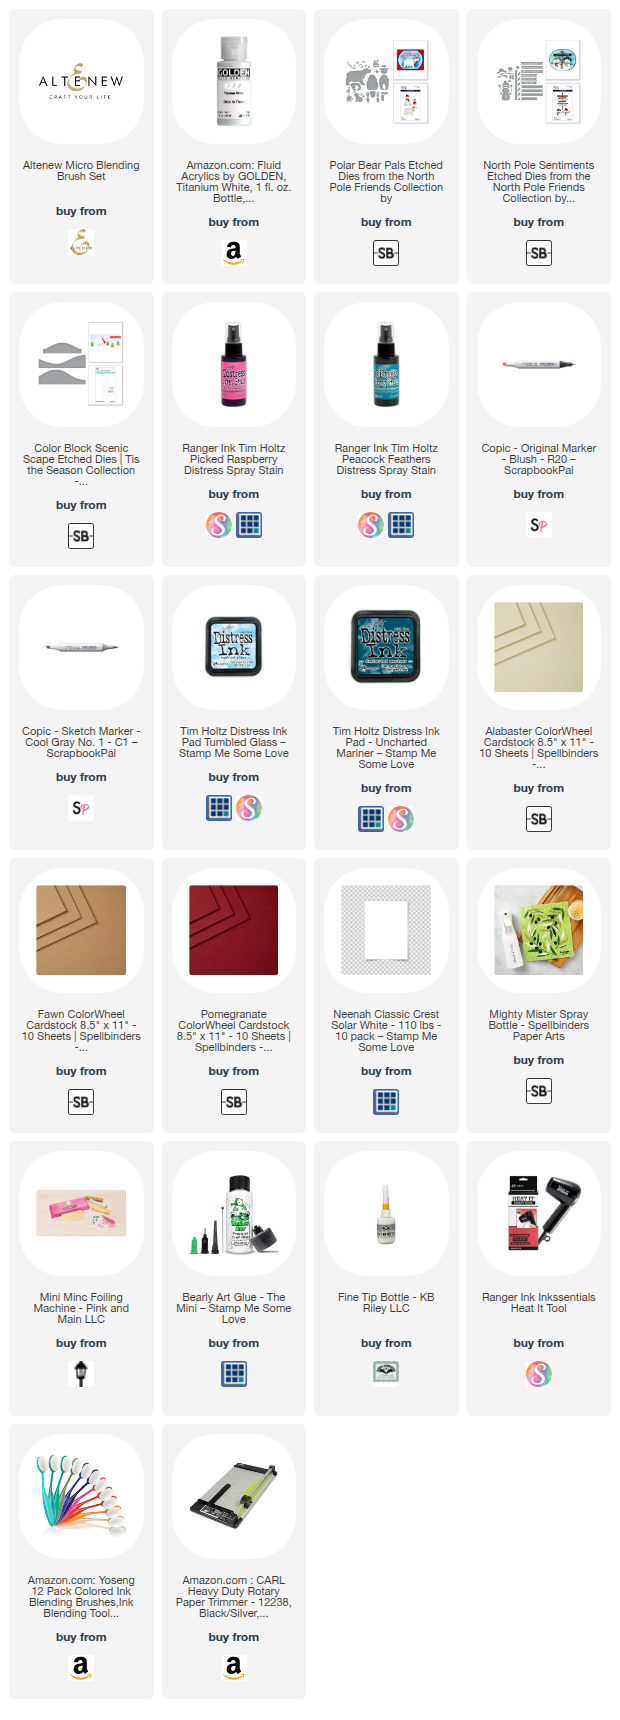
Four Detailed Techniques:
Technique 1: The Classic Wet-on-Wet Aurora This foundational technique creates the most natural-looking Northern Lights effect. By saturating your mixed media paper first, you allow the inks to flow and blend organically, creating those signature purple transitions where pink and blue-green meet. The key is achieving the right water saturation – enough to allow movement, but not so much that colors become muddy.
Technique 2: The Controlled Stripe MethodPerfect for crafters who prefer more structured designs, this technique uses deliberate ink placement in linear patterns. You'll learn how to create those distinctive vertical bands of aurora light that photographers capture in arctic skies, while still maintaining natural color blending at the edges.
Technique 3: The Dry-First Precision Approach This method gives you maximum control over color intensity and placement. By applying ink to dry paper first, colors penetrate the fibers before blending begins, creating deeper saturation and more defined color zones. It's perfect when you want specific areas of intense color.
Technique 4: The Glass Mat Innovation This advanced technique uses your craft mat as a palette, allowing you to build up ink layers and transfer them strategically. You'll create unique textures and depth that can't be achieved with direct application, plus you can reuse the ink on your mat for multiple cards!
Troubleshooting Your Aurora Backgrounds:
- Colors too muddy? Use less water and allow each color to set slightly before adding the next
- Not enough blending? Add small amounts of water with a brush to encourage color movement
- Paper buckling? Use heavier watercolor cardstock and work in a splatter box for support
- Colors too light? Build up intensity gradually with multiple light applications rather than one heavy application
Assembly Tips for Professional Results:
The key to professional-looking cards lies in the details. I'll show you how to use ink blending to create realistic shadows under your polar bears, the proper way to layer the candy cane stripes on the North Pole sign, and how to trim your snow banks for perfect placement. These small touches transform a cute card into a stunning masterpiece.
Video Tutorial
In the complete video tutorial, you'll see:
- Real-time demonstrations of all four mixed media techniques
- Close-up views of ink behavior on watercolor paper
- Proper water-to-ink ratios for each method
- Die-cutting setup and alignment tips
- Detailed assembly with precise placement guidance
- Troubleshooting common issues as they happen
- Professional finishing techniques
View the Full Video Tutorial Here
Creative Variations to Try:
Once you master these techniques, consider these creative variations:
- Use different distress ink color combinations (maybe blues and purples for a cooler aurora, or oranges and pinks for a warmer sunset effect)
- Add multiple polar bears for a family scene
- Create different seasonal backgrounds using the same watercolor methods
- Experiment with different snow bank configurations for varied landscapes
Perfect for Gift-Giving and Special Occasions:
These cards are ideal for:
- Holiday greetings that stand out from store-bought cards
- Winter birthday celebrations
- Thank you cards with a cozy, personal touch
- Friendship cards that show you care
- Any occasion where you want to share warmth and wonder
Love these Spellbinders Dies?
If this project inspires you, you might want to explore more of Spellbinders' monthly releases! They consistently create dies that combine beautifully with mixed media techniques, giving you endless creative possibilities. Their attention to detail in the cutting edges and layering elements makes assembly a joy rather than a challenge.
Join Our Creative Community:
I'd absolutely love to see what you create with these techniques! Share your winter wonderland cards with our supportive community using #StampMeSomeLove – seeing your beautiful creations and the joy they bring always fills my heart with such happiness.
There's nothing quite like the satisfaction of creating something beautiful with your own hands, and when that creation brings a smile to someone else's face, it multiplies the joy exponentially. That's the magic we celebrate here at Stamp Me Some Love.
Your Crafting Journey Matters:
Whether this is your first mixed media project or you're expanding your existing skills, remember that every technique takes practice to perfect. Be patient with yourself, embrace the happy accidents (they often lead to the most beautiful effects!), and most importantly, enjoy the creative process.
The therapeutic benefits of mixed media work are incredible – there's something so calming about watching colors flow and blend, creating something beautiful from simple inks and water. Add the joy of crafting adorable characters, and you have a project that nurtures both your creativity and your well-being.
What's Next?
After you try these techniques, I'd love to hear which aurora method became your favorite! Do you prefer the organic flow of the wet-on-wet technique, or does the controlled precision of the dry-first method speak to your crafting style?
Keep an eye out for future tutorials where we'll explore more ways to combine mixed media techniques with die-cutting for stunning dimensional effects. The possibilities are truly endless when you start thinking outside the box with your crafting supplies!
That was amazing. I love the way you colored the background. The bears are just too cute.